Color Space
PDFs must be submitted in the CMYK color space.
FireSprint cannot maintain accurate color with both CMYK and RGB color spaces included in a file.

Images
Images must be:
• Embedded at final size
• Minimum resolution of 100ppi at the final size
Fonts
▎Digital Rigid Printing
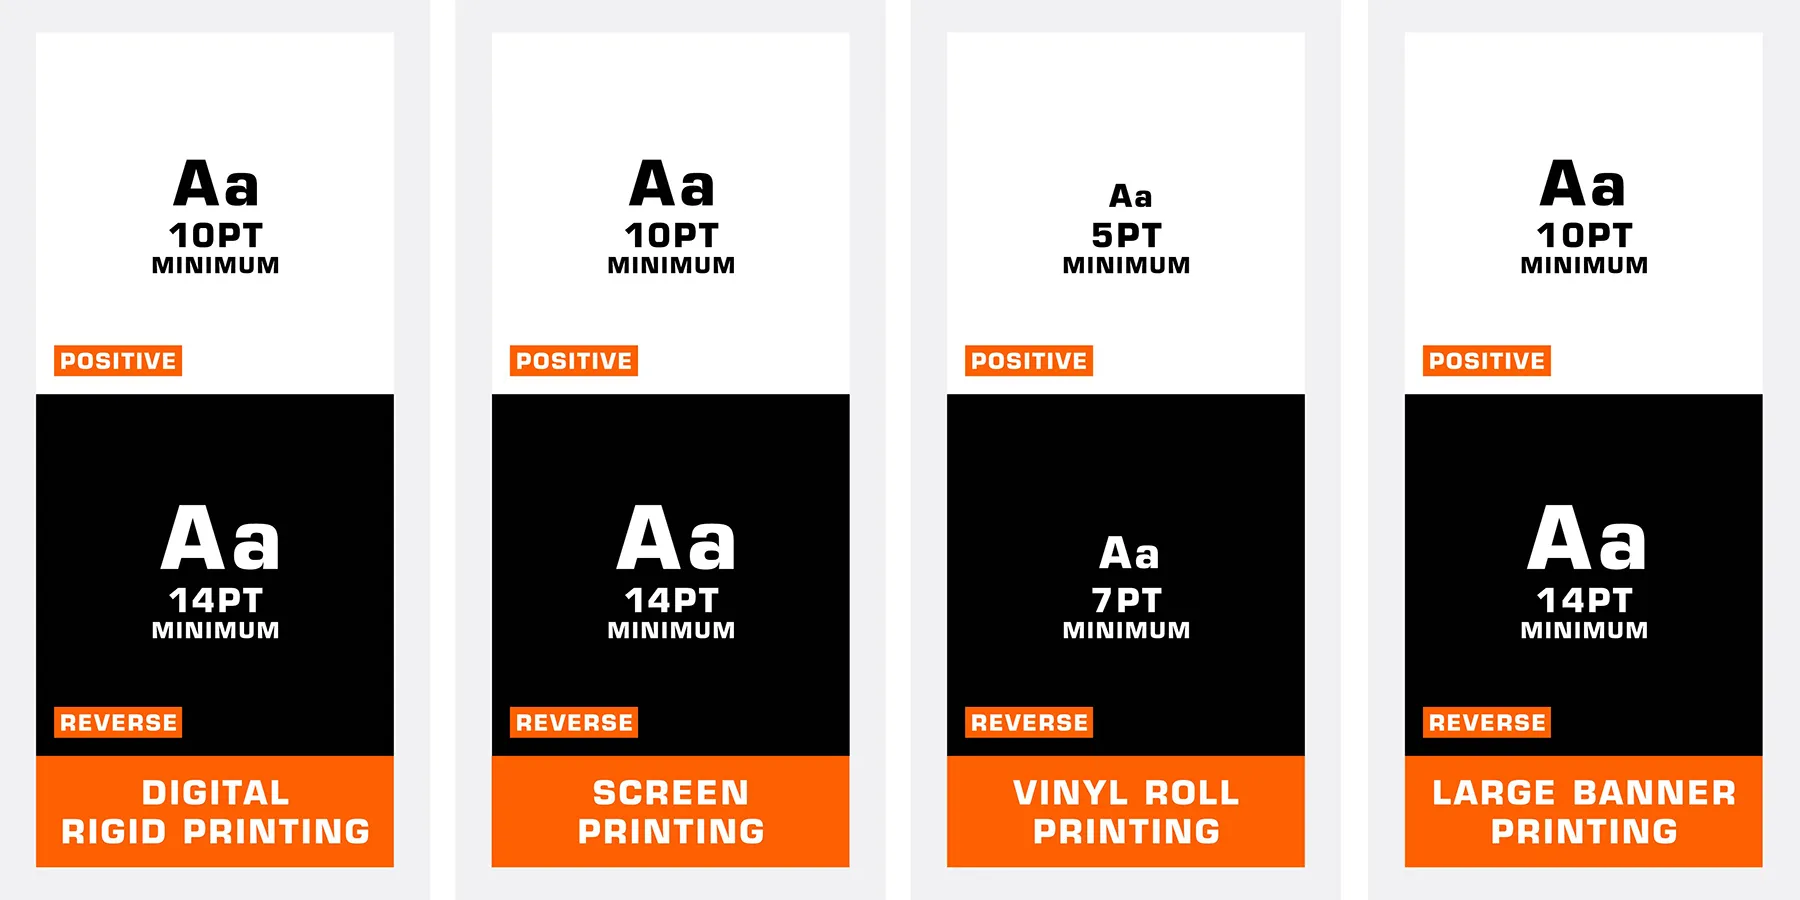
Minimum type size of 10pt for positive type and 14pt for reverse type
▎Vinyl Roll & Sticker Printing
Minimum type size of 5pt for positive type and 7pt for reverse type
▎Large Format Banners
Minimum type size of 10pt for positive type and 14pt for reverse type
▎Variable Data
The font file must be provided

Line Widths
▎Digital Rigid Printing
Minimum of 0.5pt for positive line widths and 1pt for reverse line widths
▎Vinyl Roll & Sticker Printing
Minimum of 0.5pt for positive line widths and 0.5pt for reverse line widths
▎Large Format Banners
Minimum of 0.5pt for positive line widths and 1pt for reverse line widths

Bleed
▎Auto-Generated Bleed
Bleed will be auto-generated for artwork that touches the edge of the sheet for all products. Do not include in file.
▎If File Already Has Bleed
If uploading a file with bleed, you’ll need to crop or skew the image in the uploader and will be prompted to do so.
If possible, we recommend re-uploading the file without bleed.
Kiss Cuts
We have a max number of 100 pieces per kiss cut decal. If you need more than 100 kiss cut pieces on a decal, please separate your designs into multiple jobs. This is due to the processing time when cutting and handling your artwork.
Contour Cuts
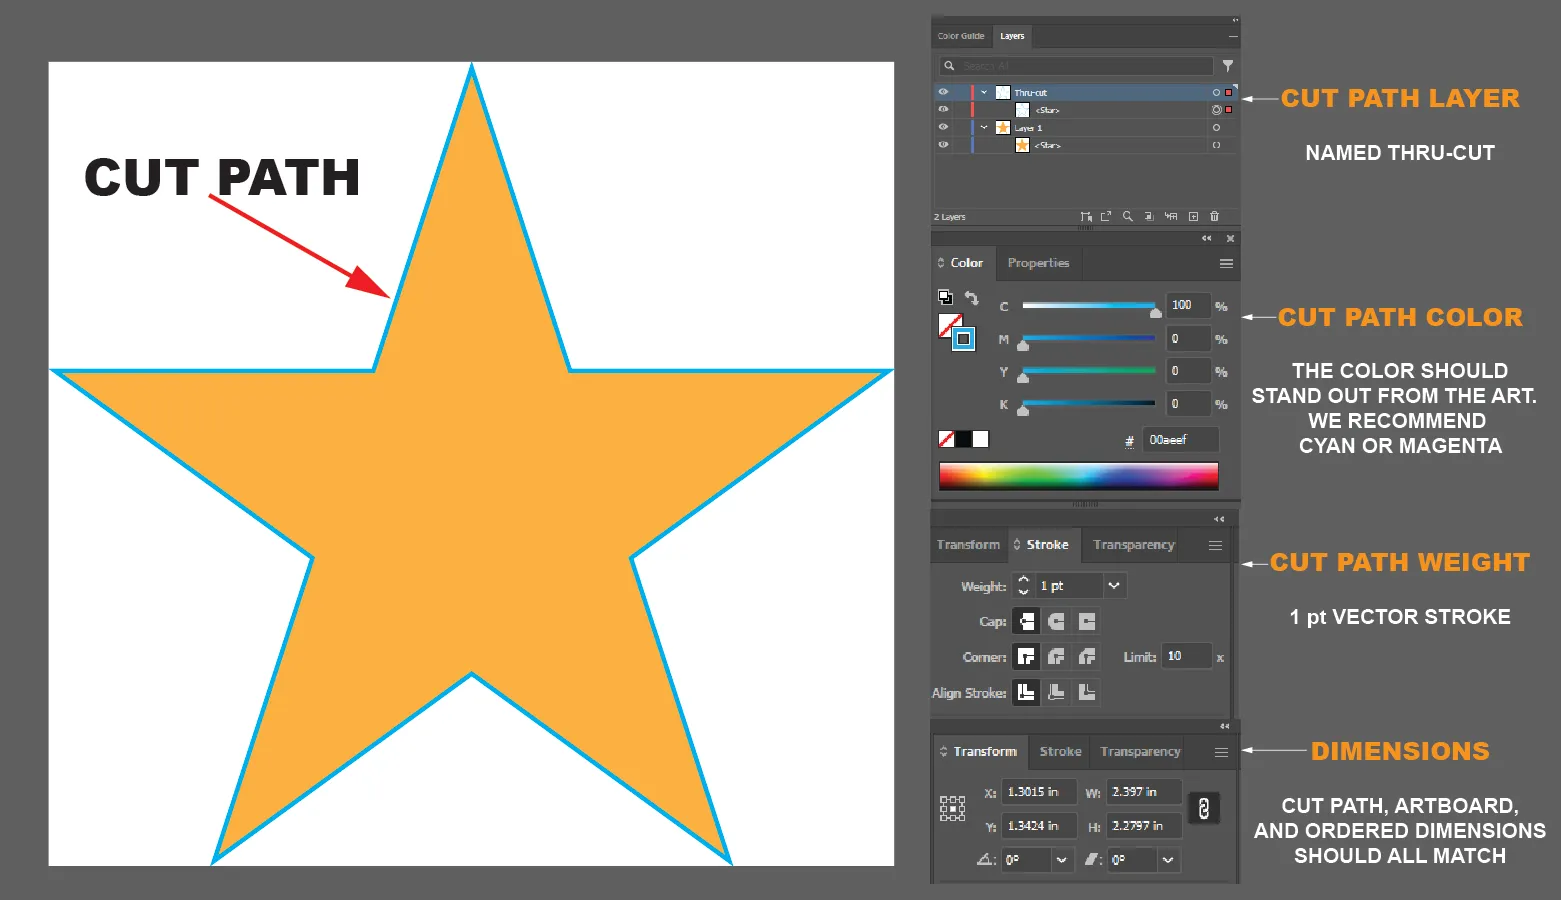
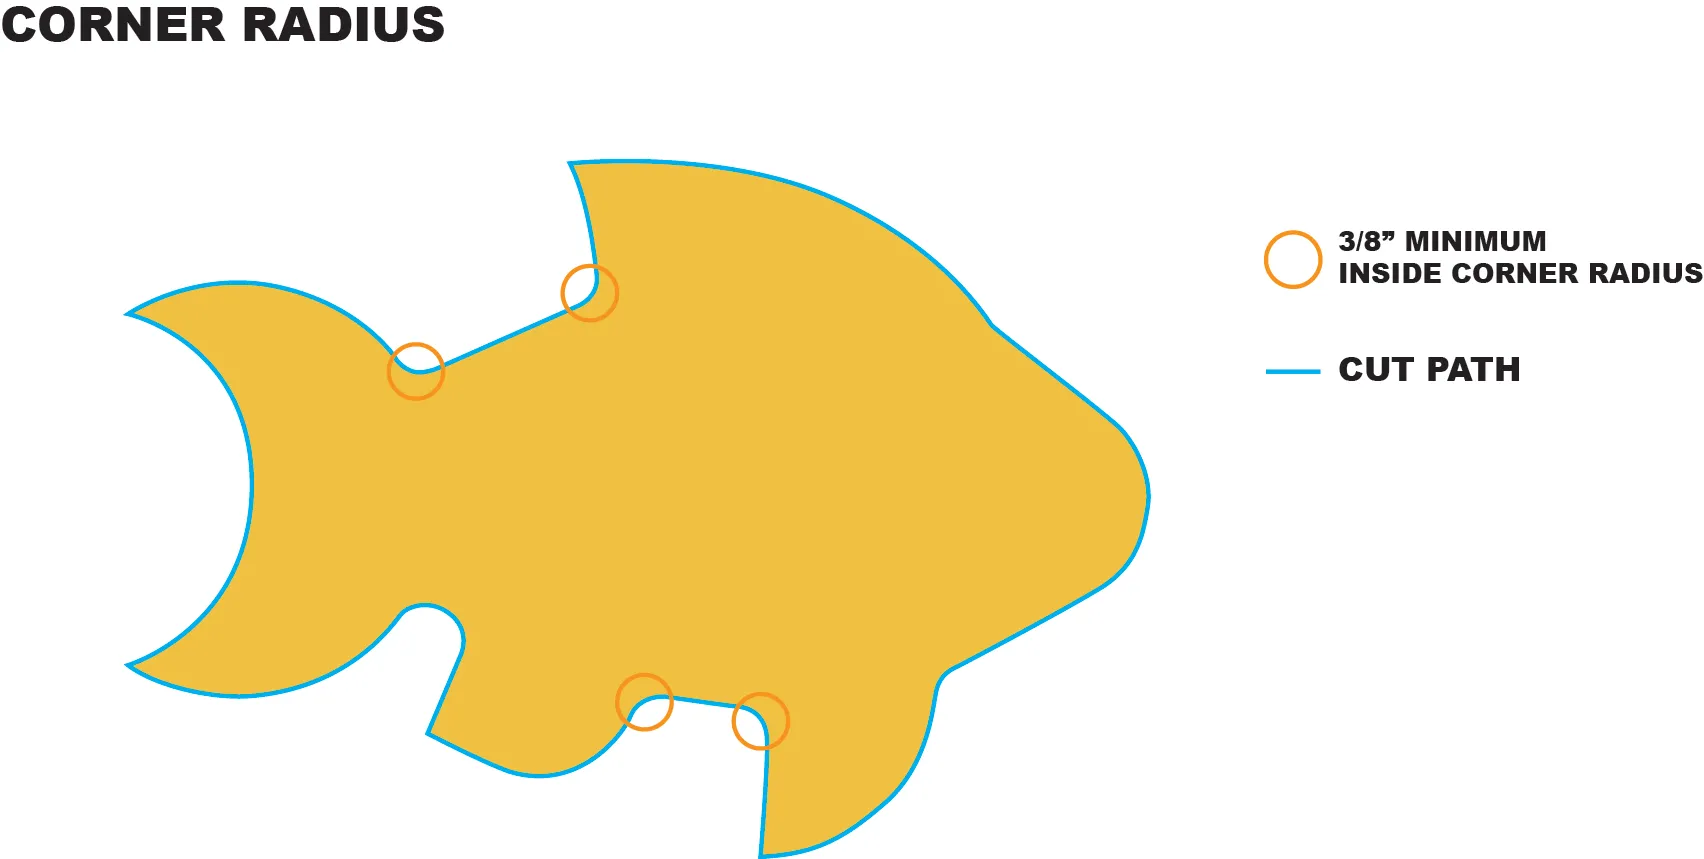
• For contour cuts on substrates thicker than 1/8” (.125), all inside cuts will require 3/8” or 0.375 radius.
• No contour cuts apply to 10mm Coroplast.
• FireSprint reserves the right to simplify overly complex contour cut paths to maximize the quality of the final product.
• Proofs are required to be sent for approval for altered cut paths at no additional cost.
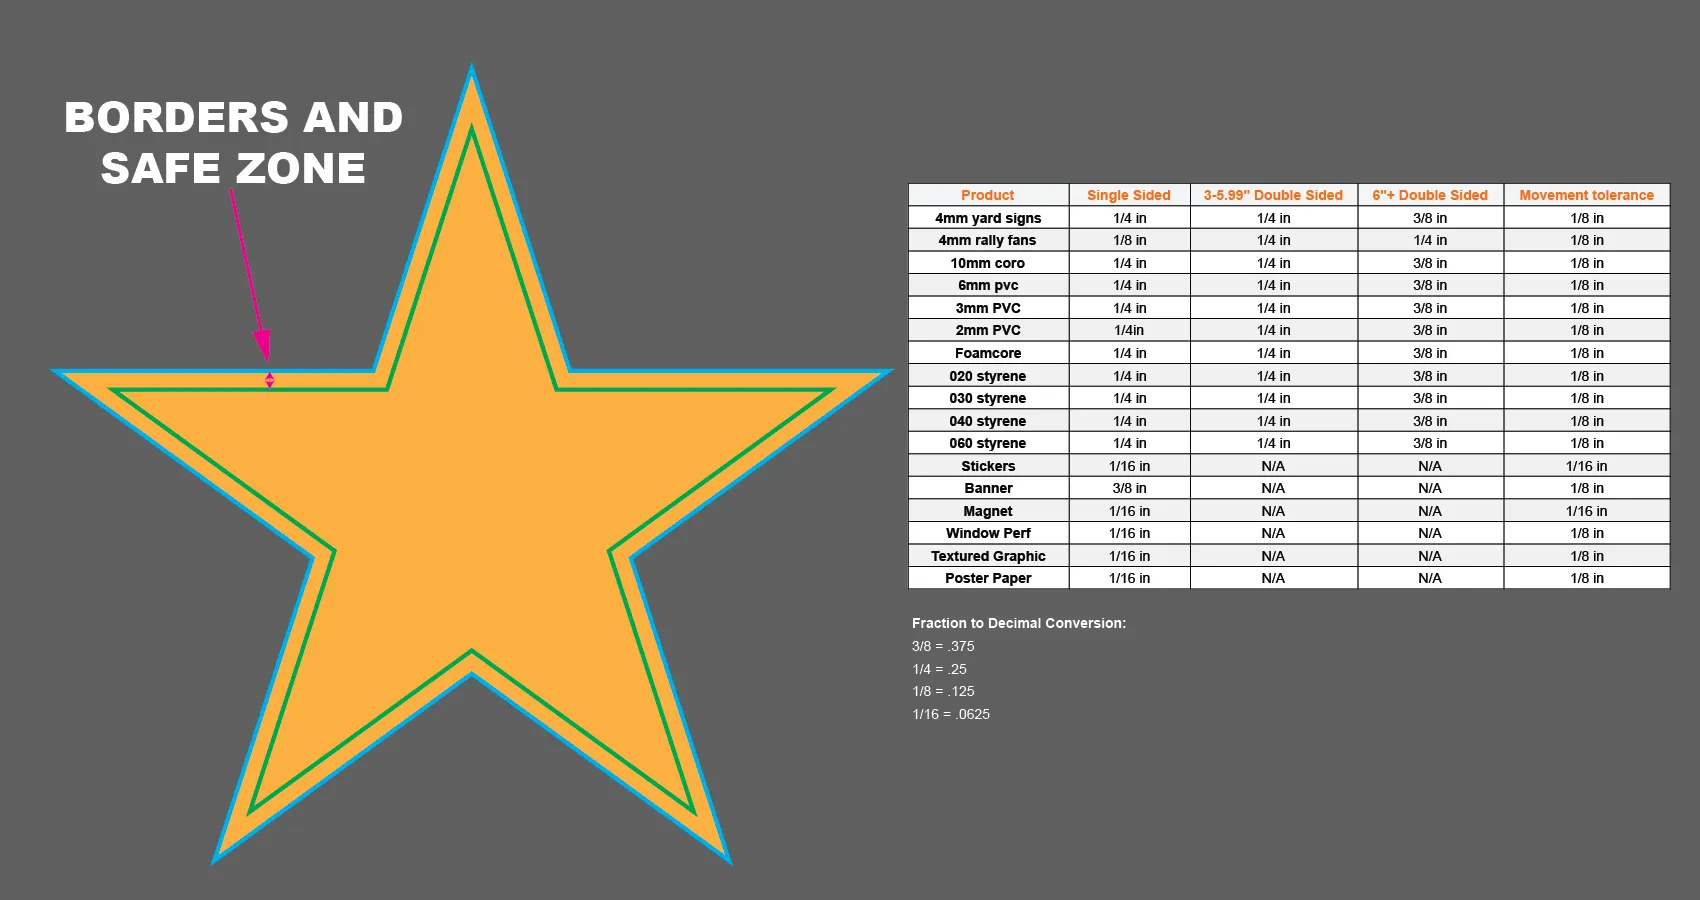
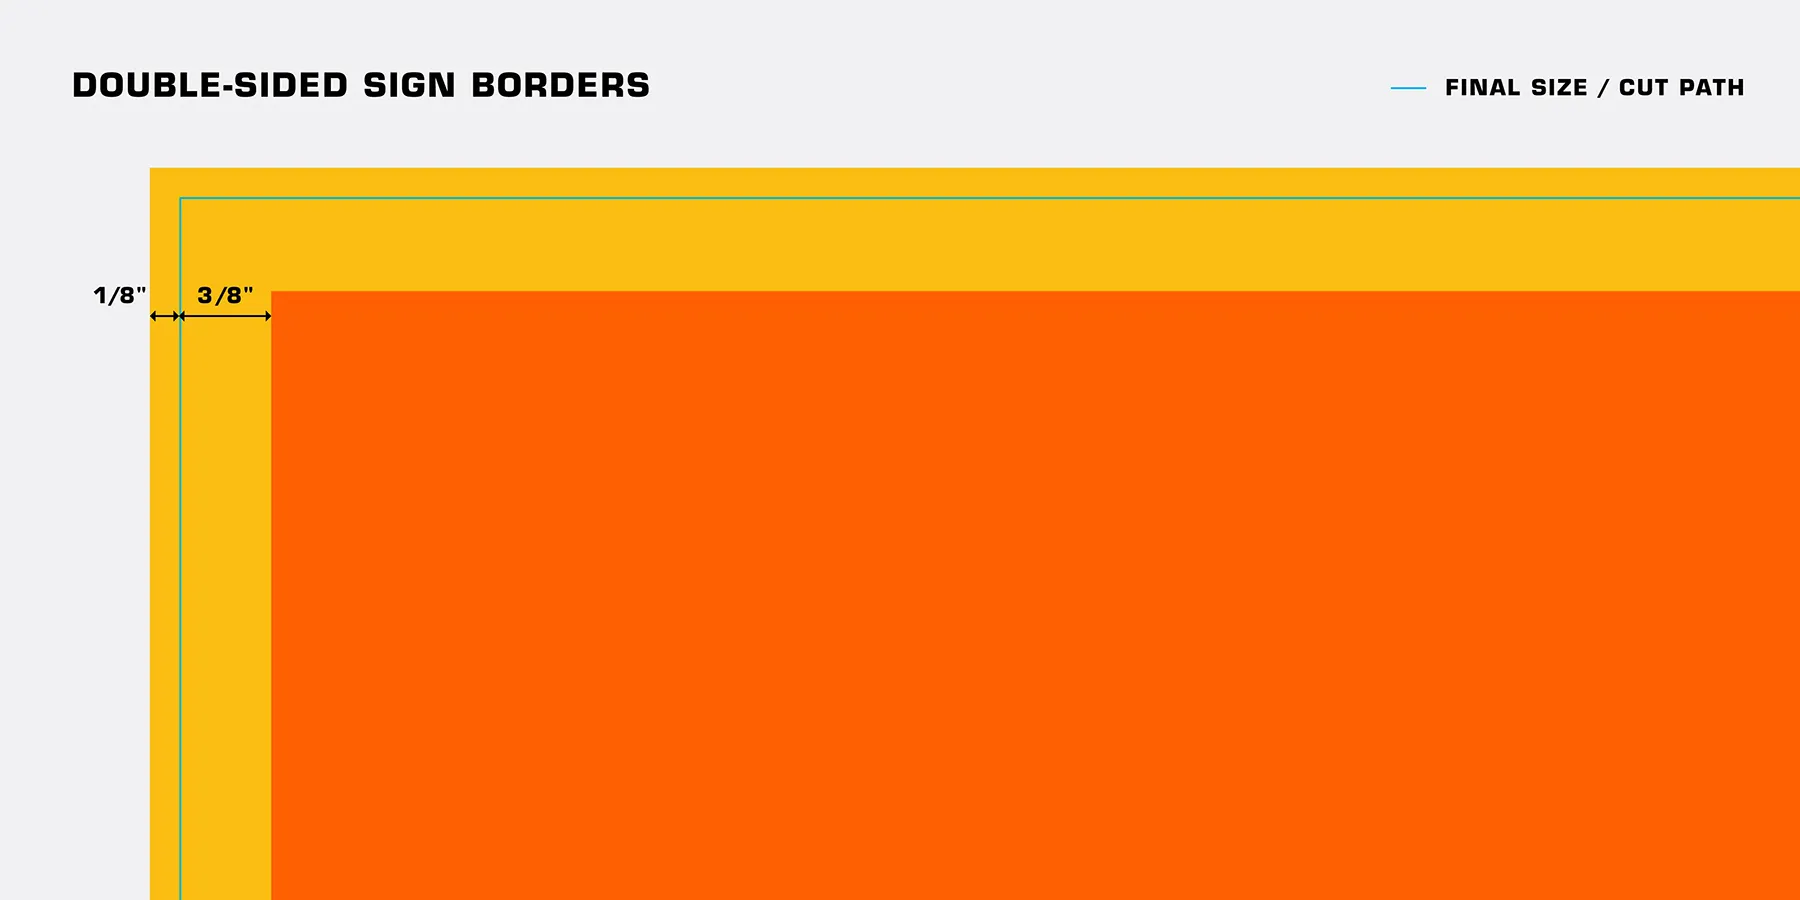
• Borders at the edge of double-sided signs must be 3/8” or thicker not including bleed.
Holographic Stickers
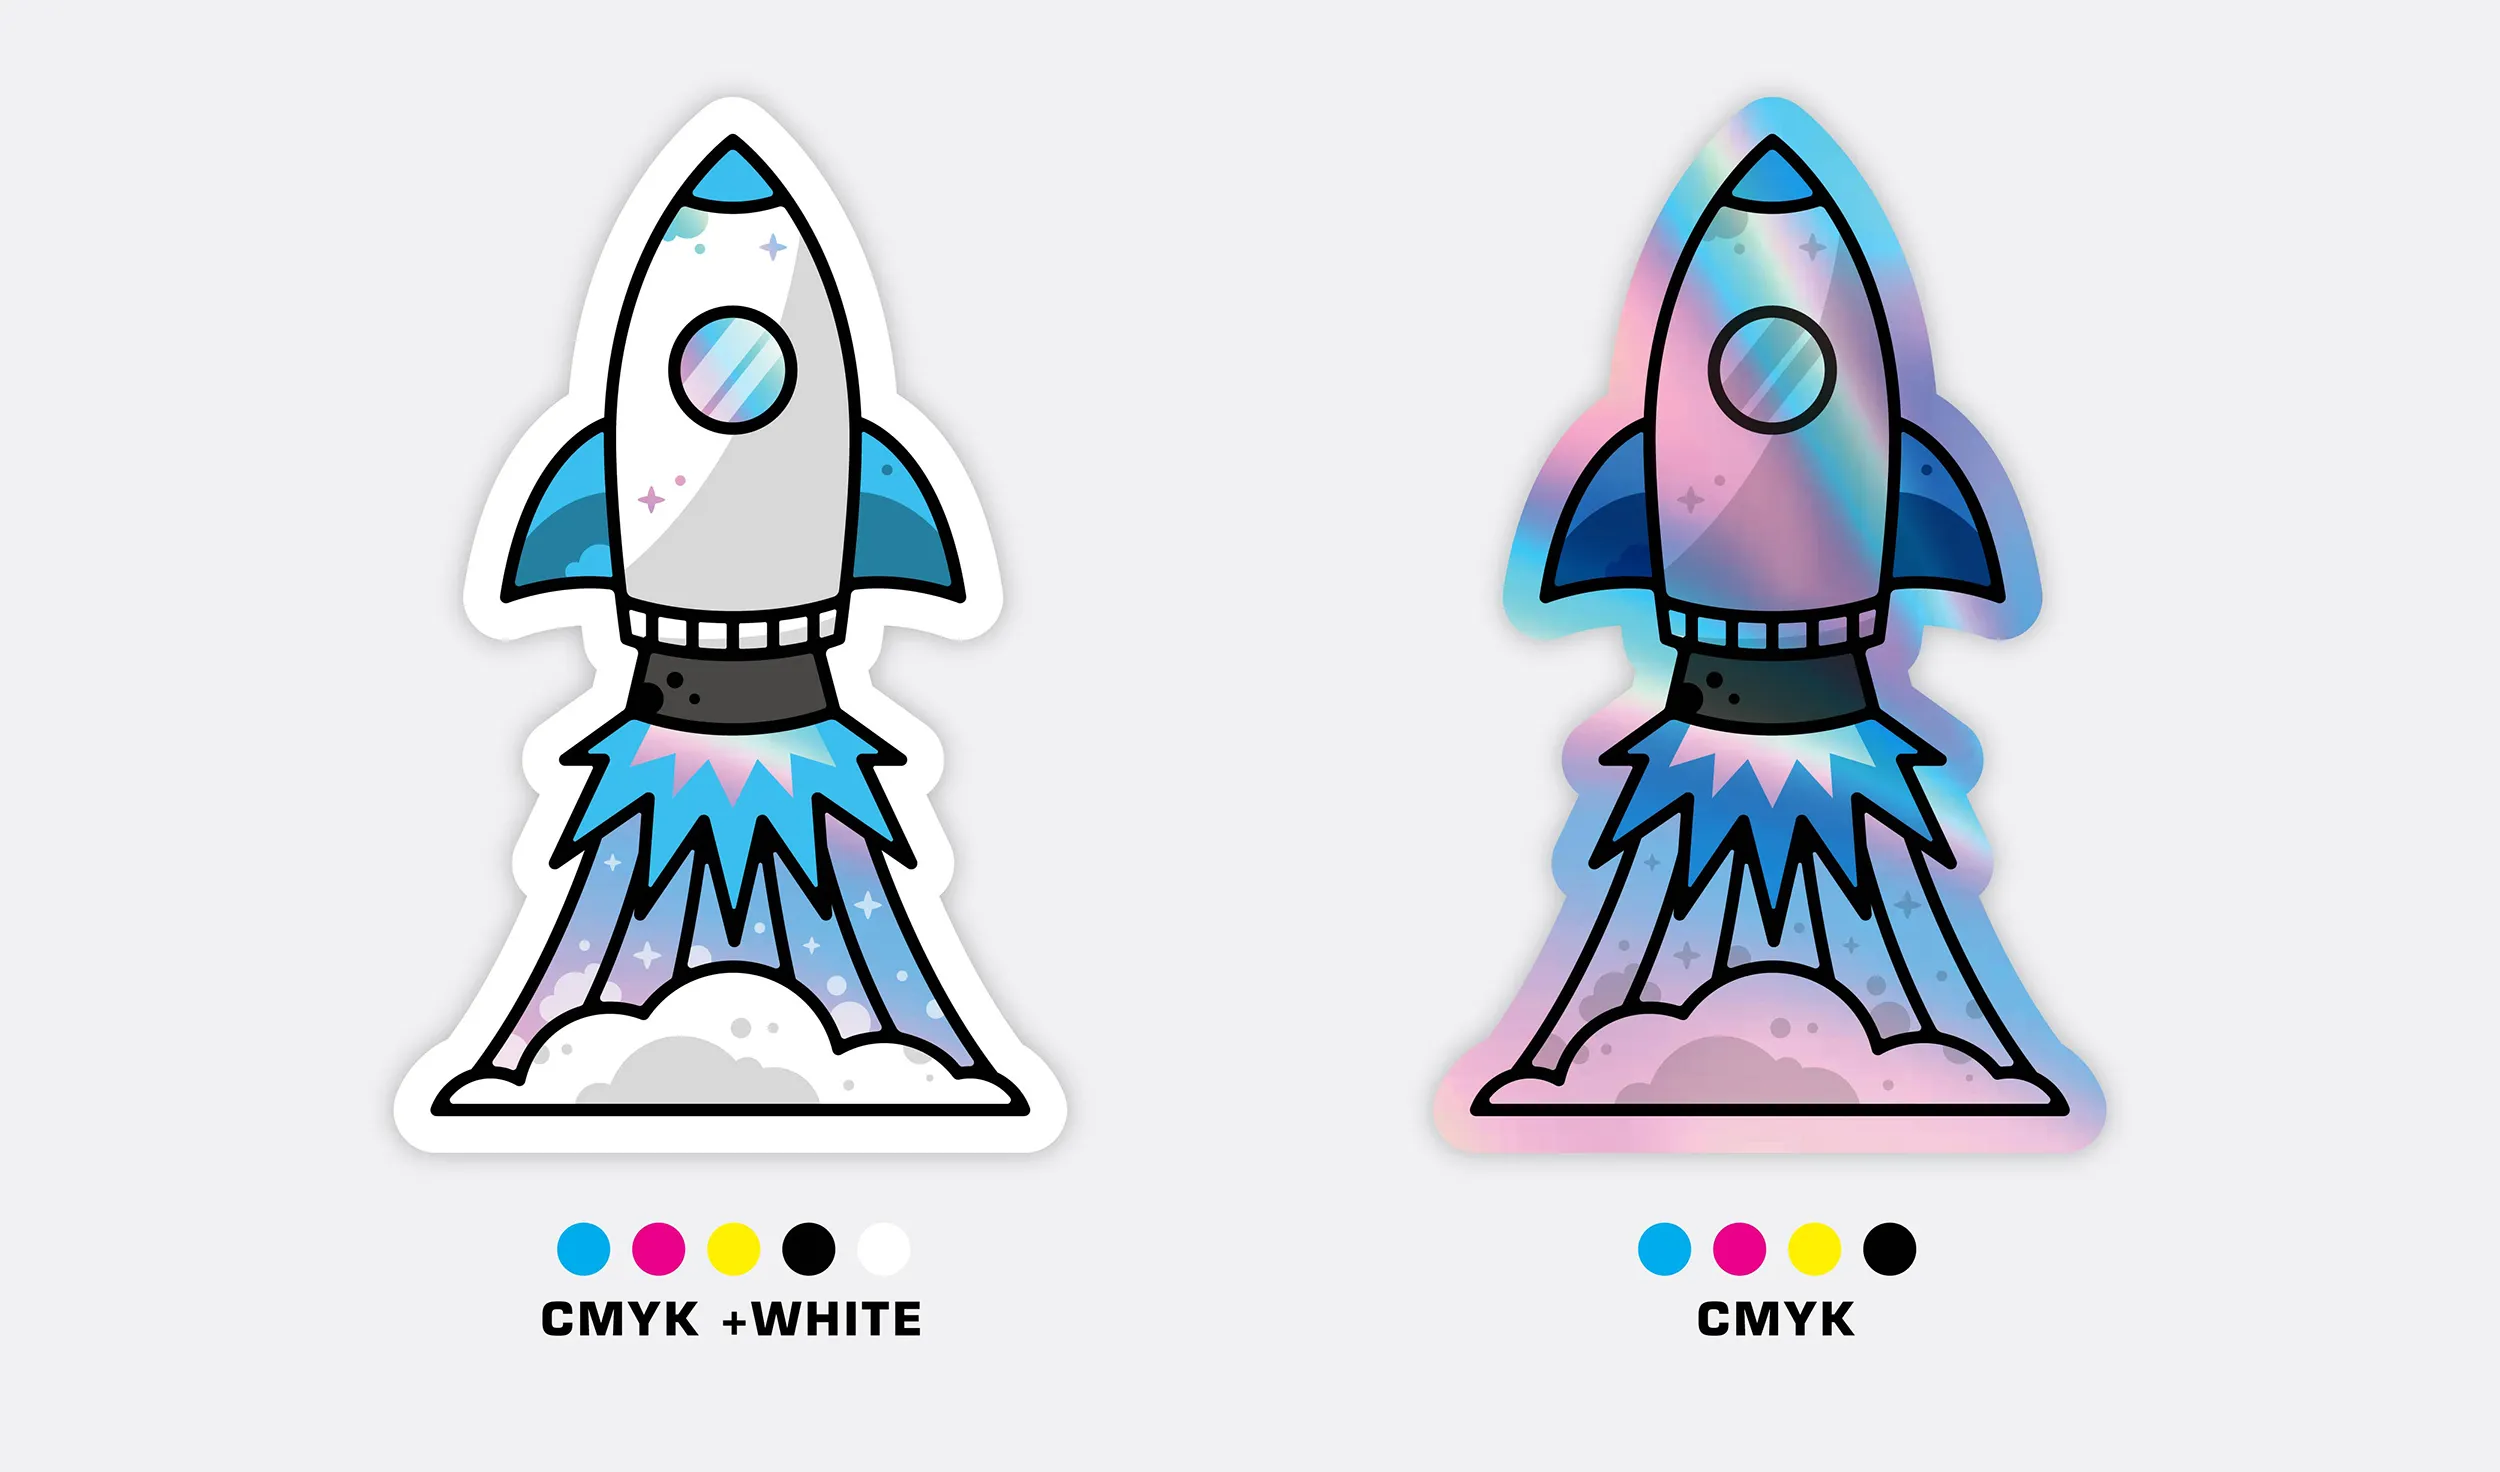
There are two options when printing on holographic vinyl: CMYK + Spot White or CMYK. Follow the steps below to create your desired effect.
CMYK + Spot White Holographic Stickers
▎OVERVIEW
• If you’d like the color white to appear in your design choose CMYK + Spot White.
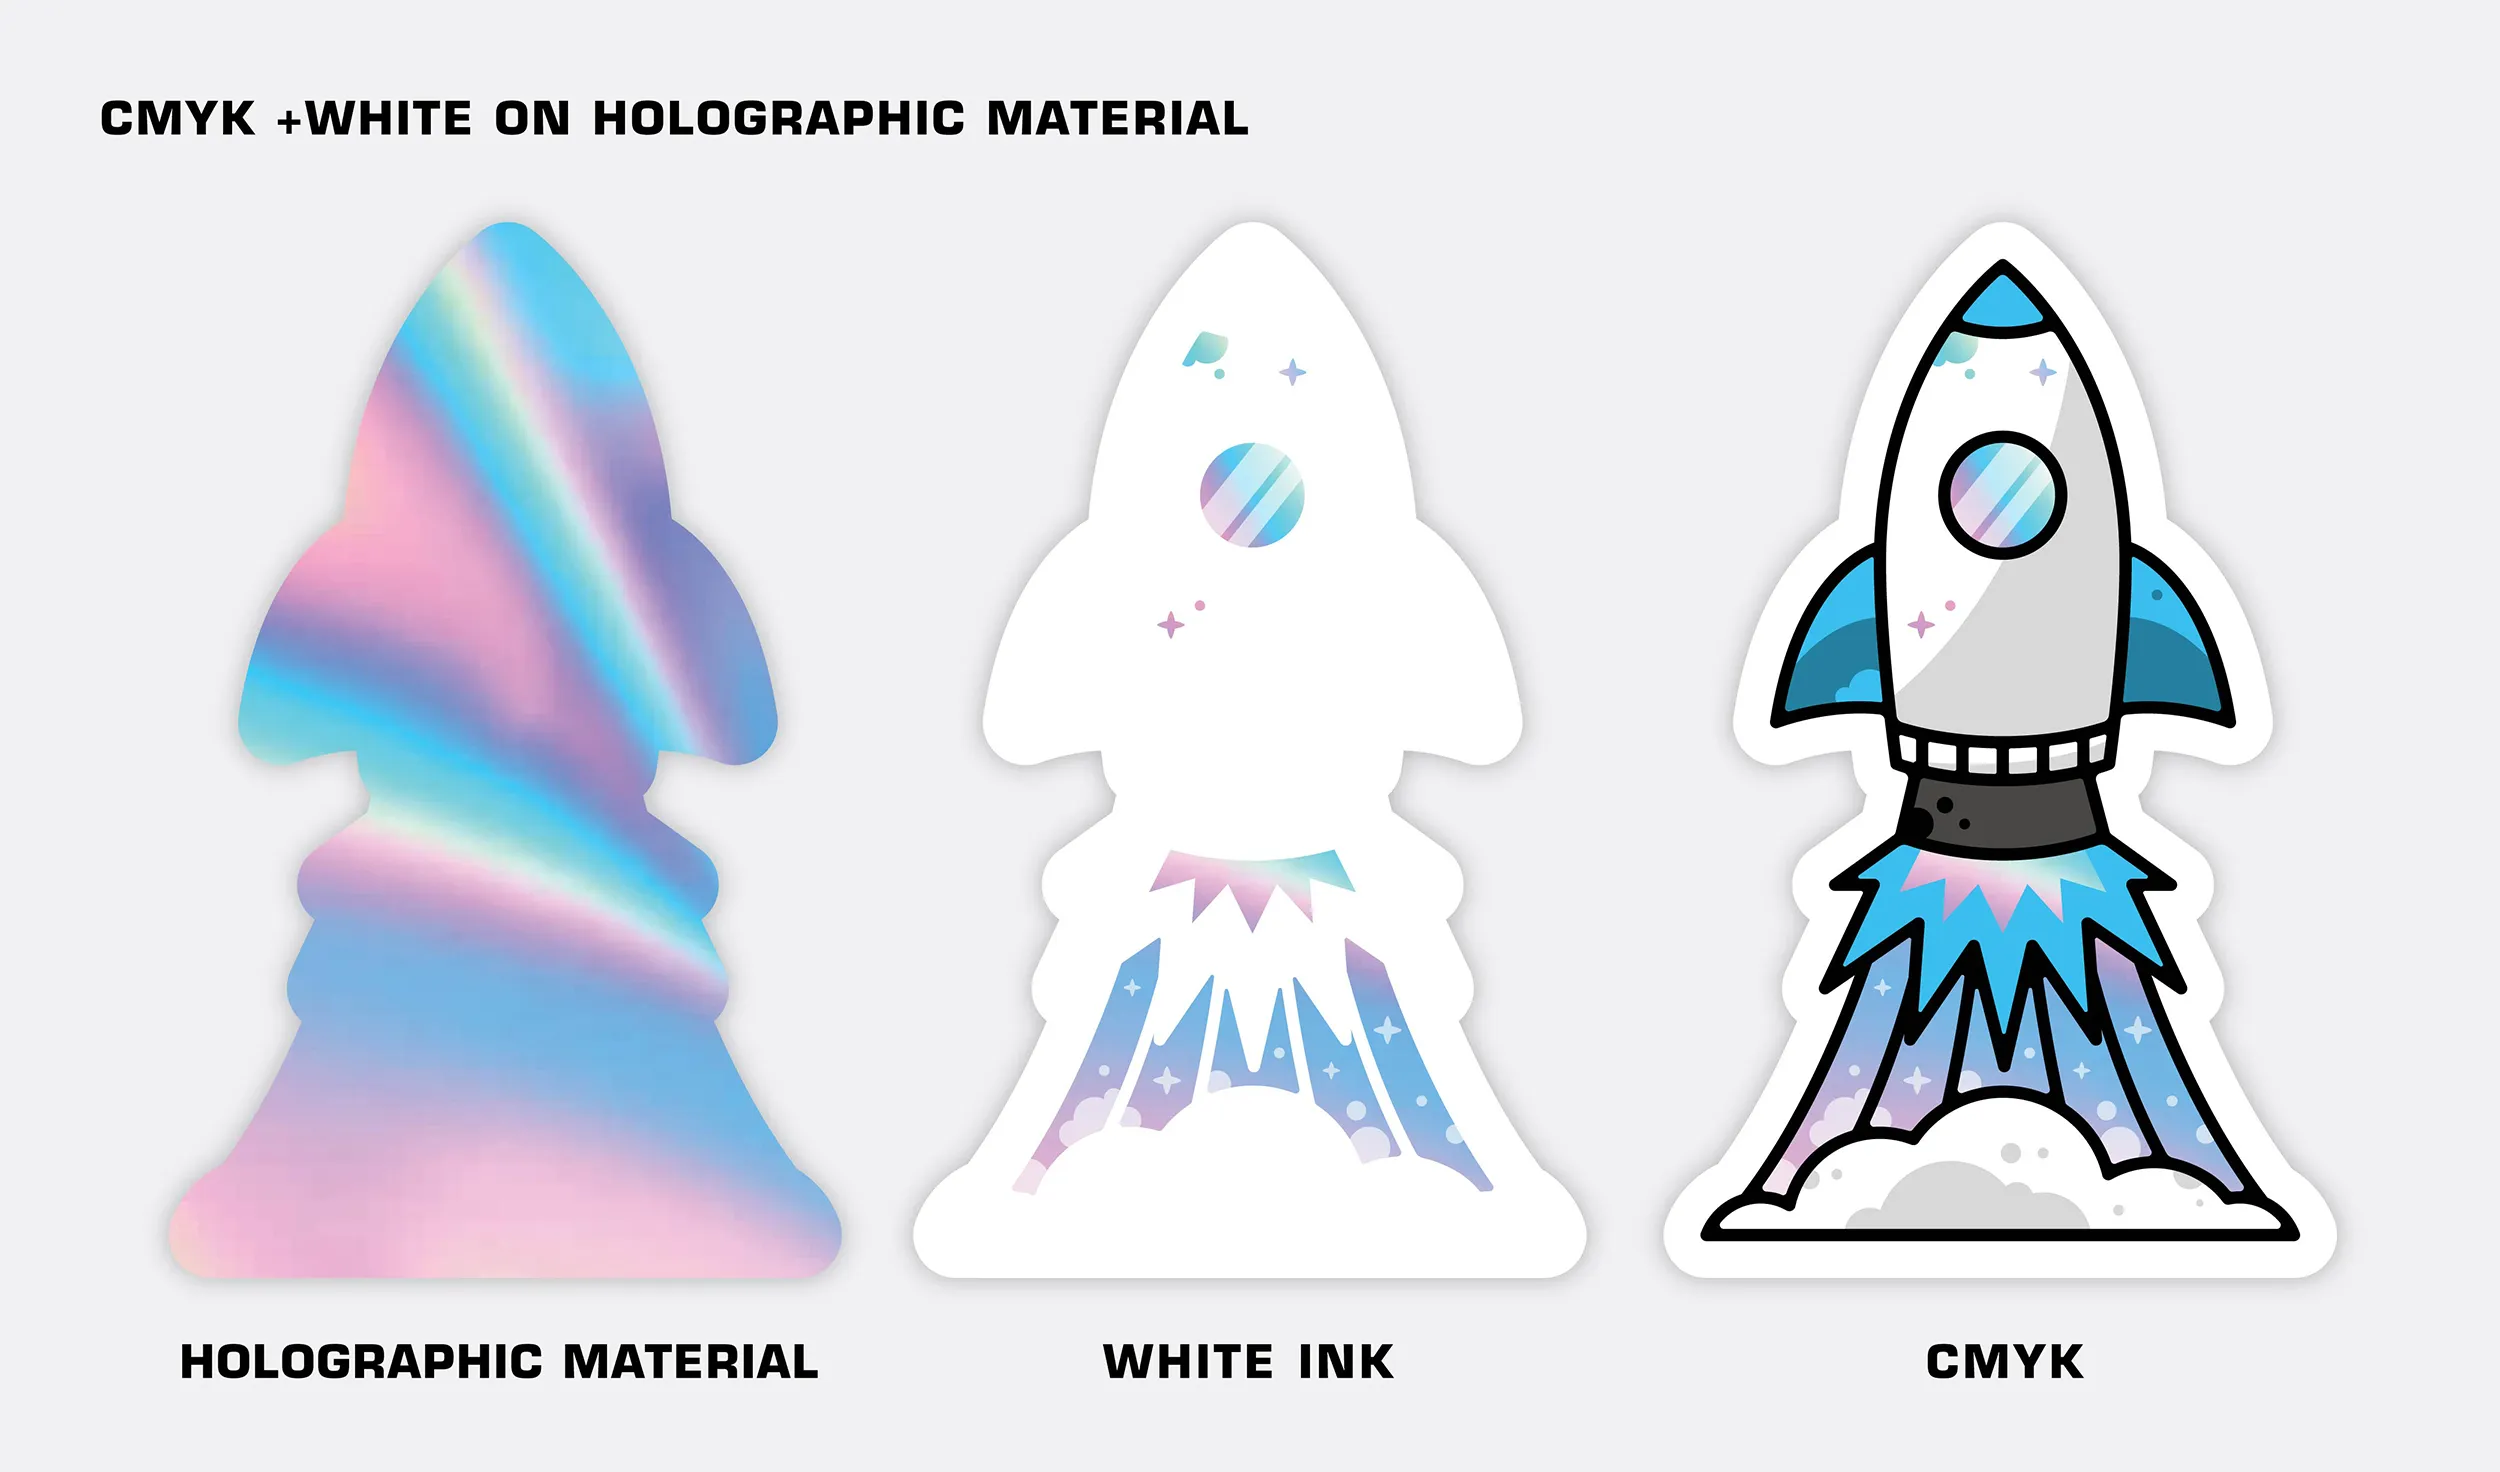
• The white layer is printed on the holographic material first, followed by the CMYK layer.
• Add a layer of white underneath any CMYK areas that you don’t want the holo effect to show through.
▎FILE SETUP FOR CMYK + Spot White
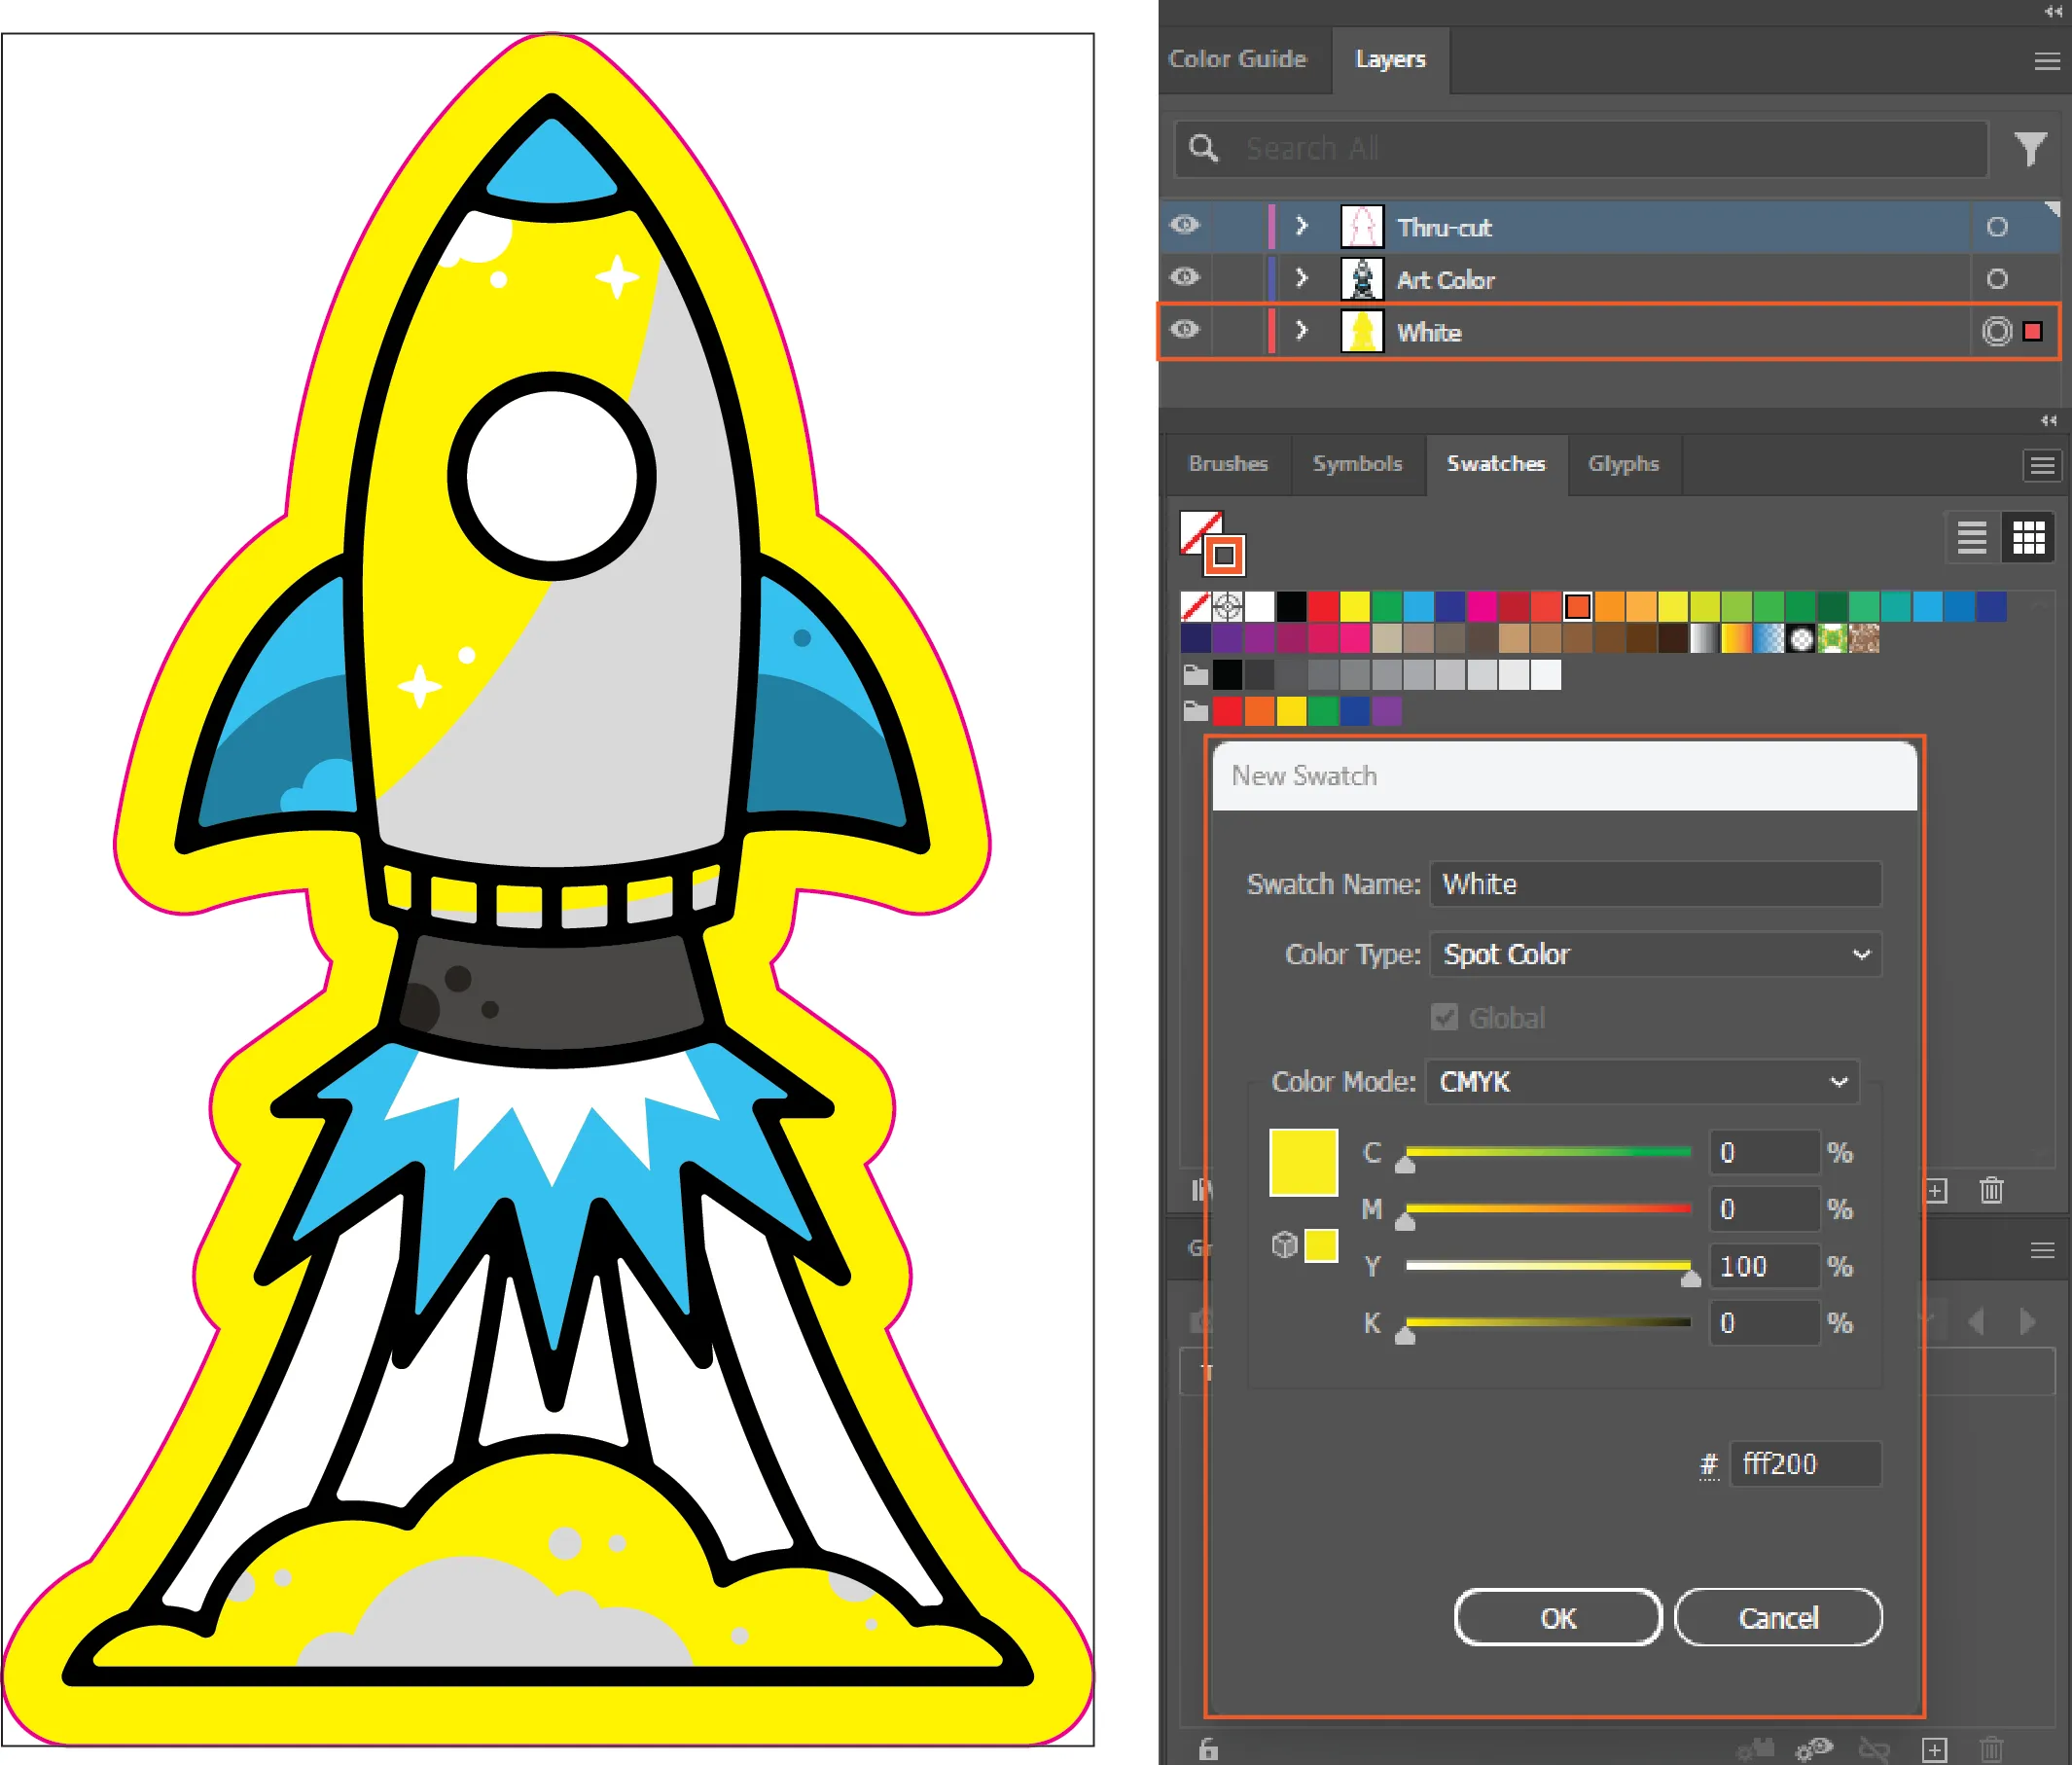
• Your file must include layers.
• Clearly label your white layer as “Spot White” and your CMYK layer as “CMYK”.
• Create a swatch named “Spot White”.
• Make sure the areas you want to print white are colored with that swatch.
▎SAVING OUT YOUR FILE FOR CMYK + White
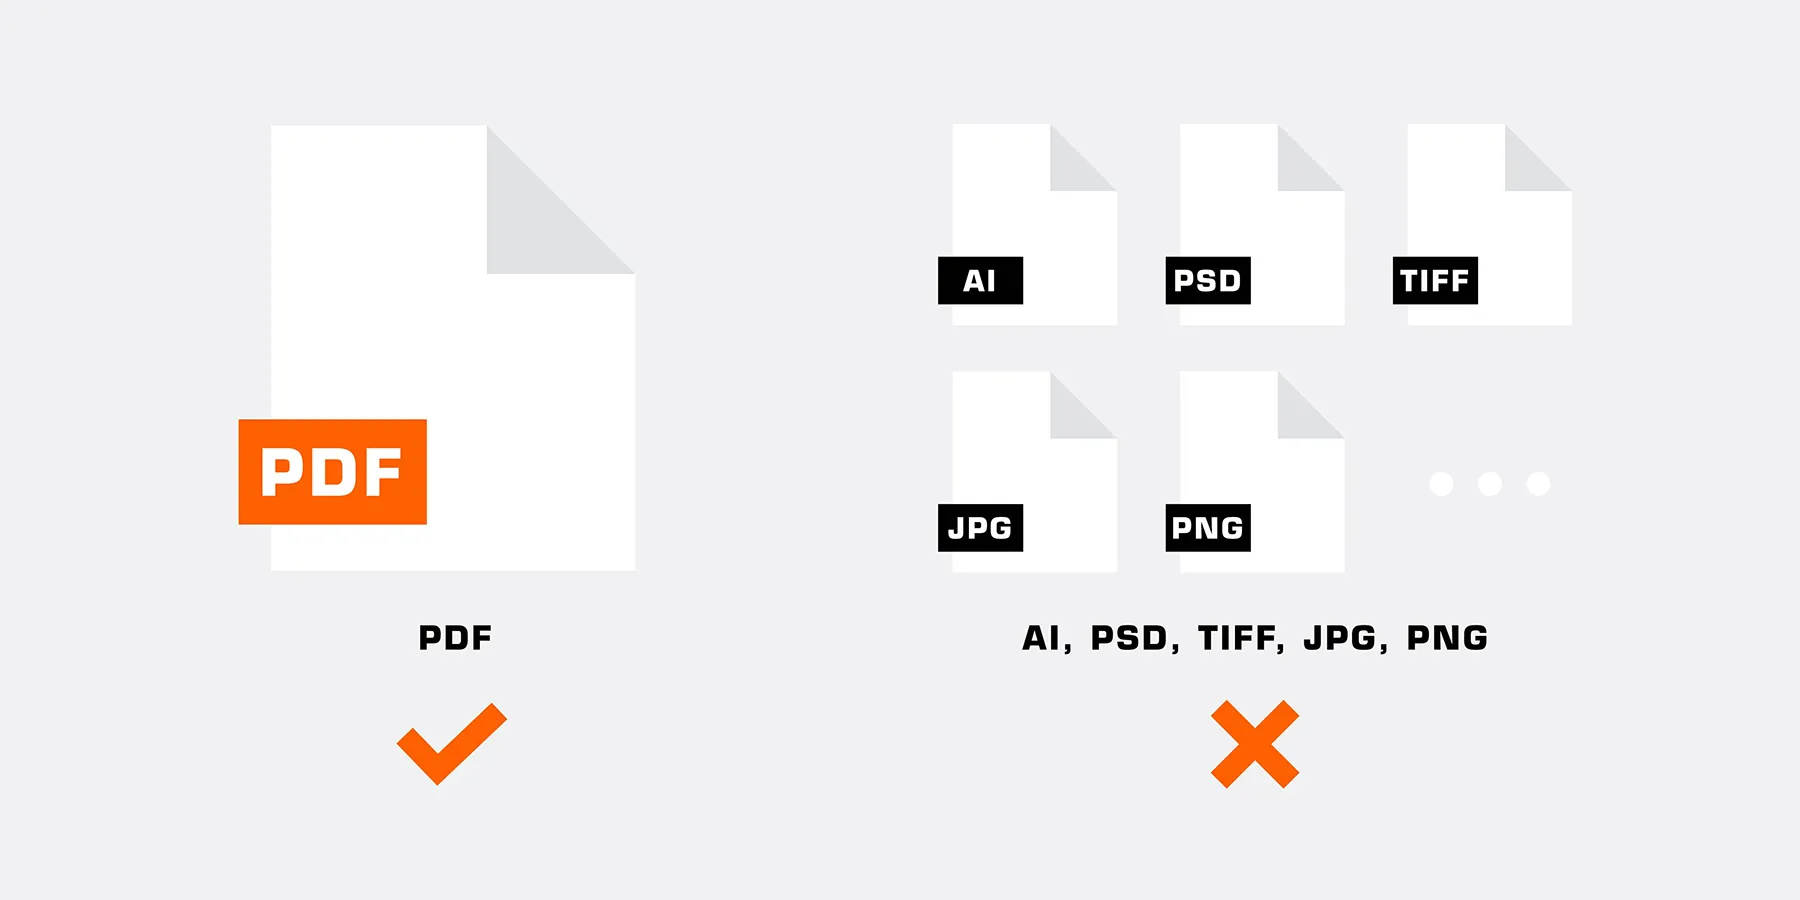
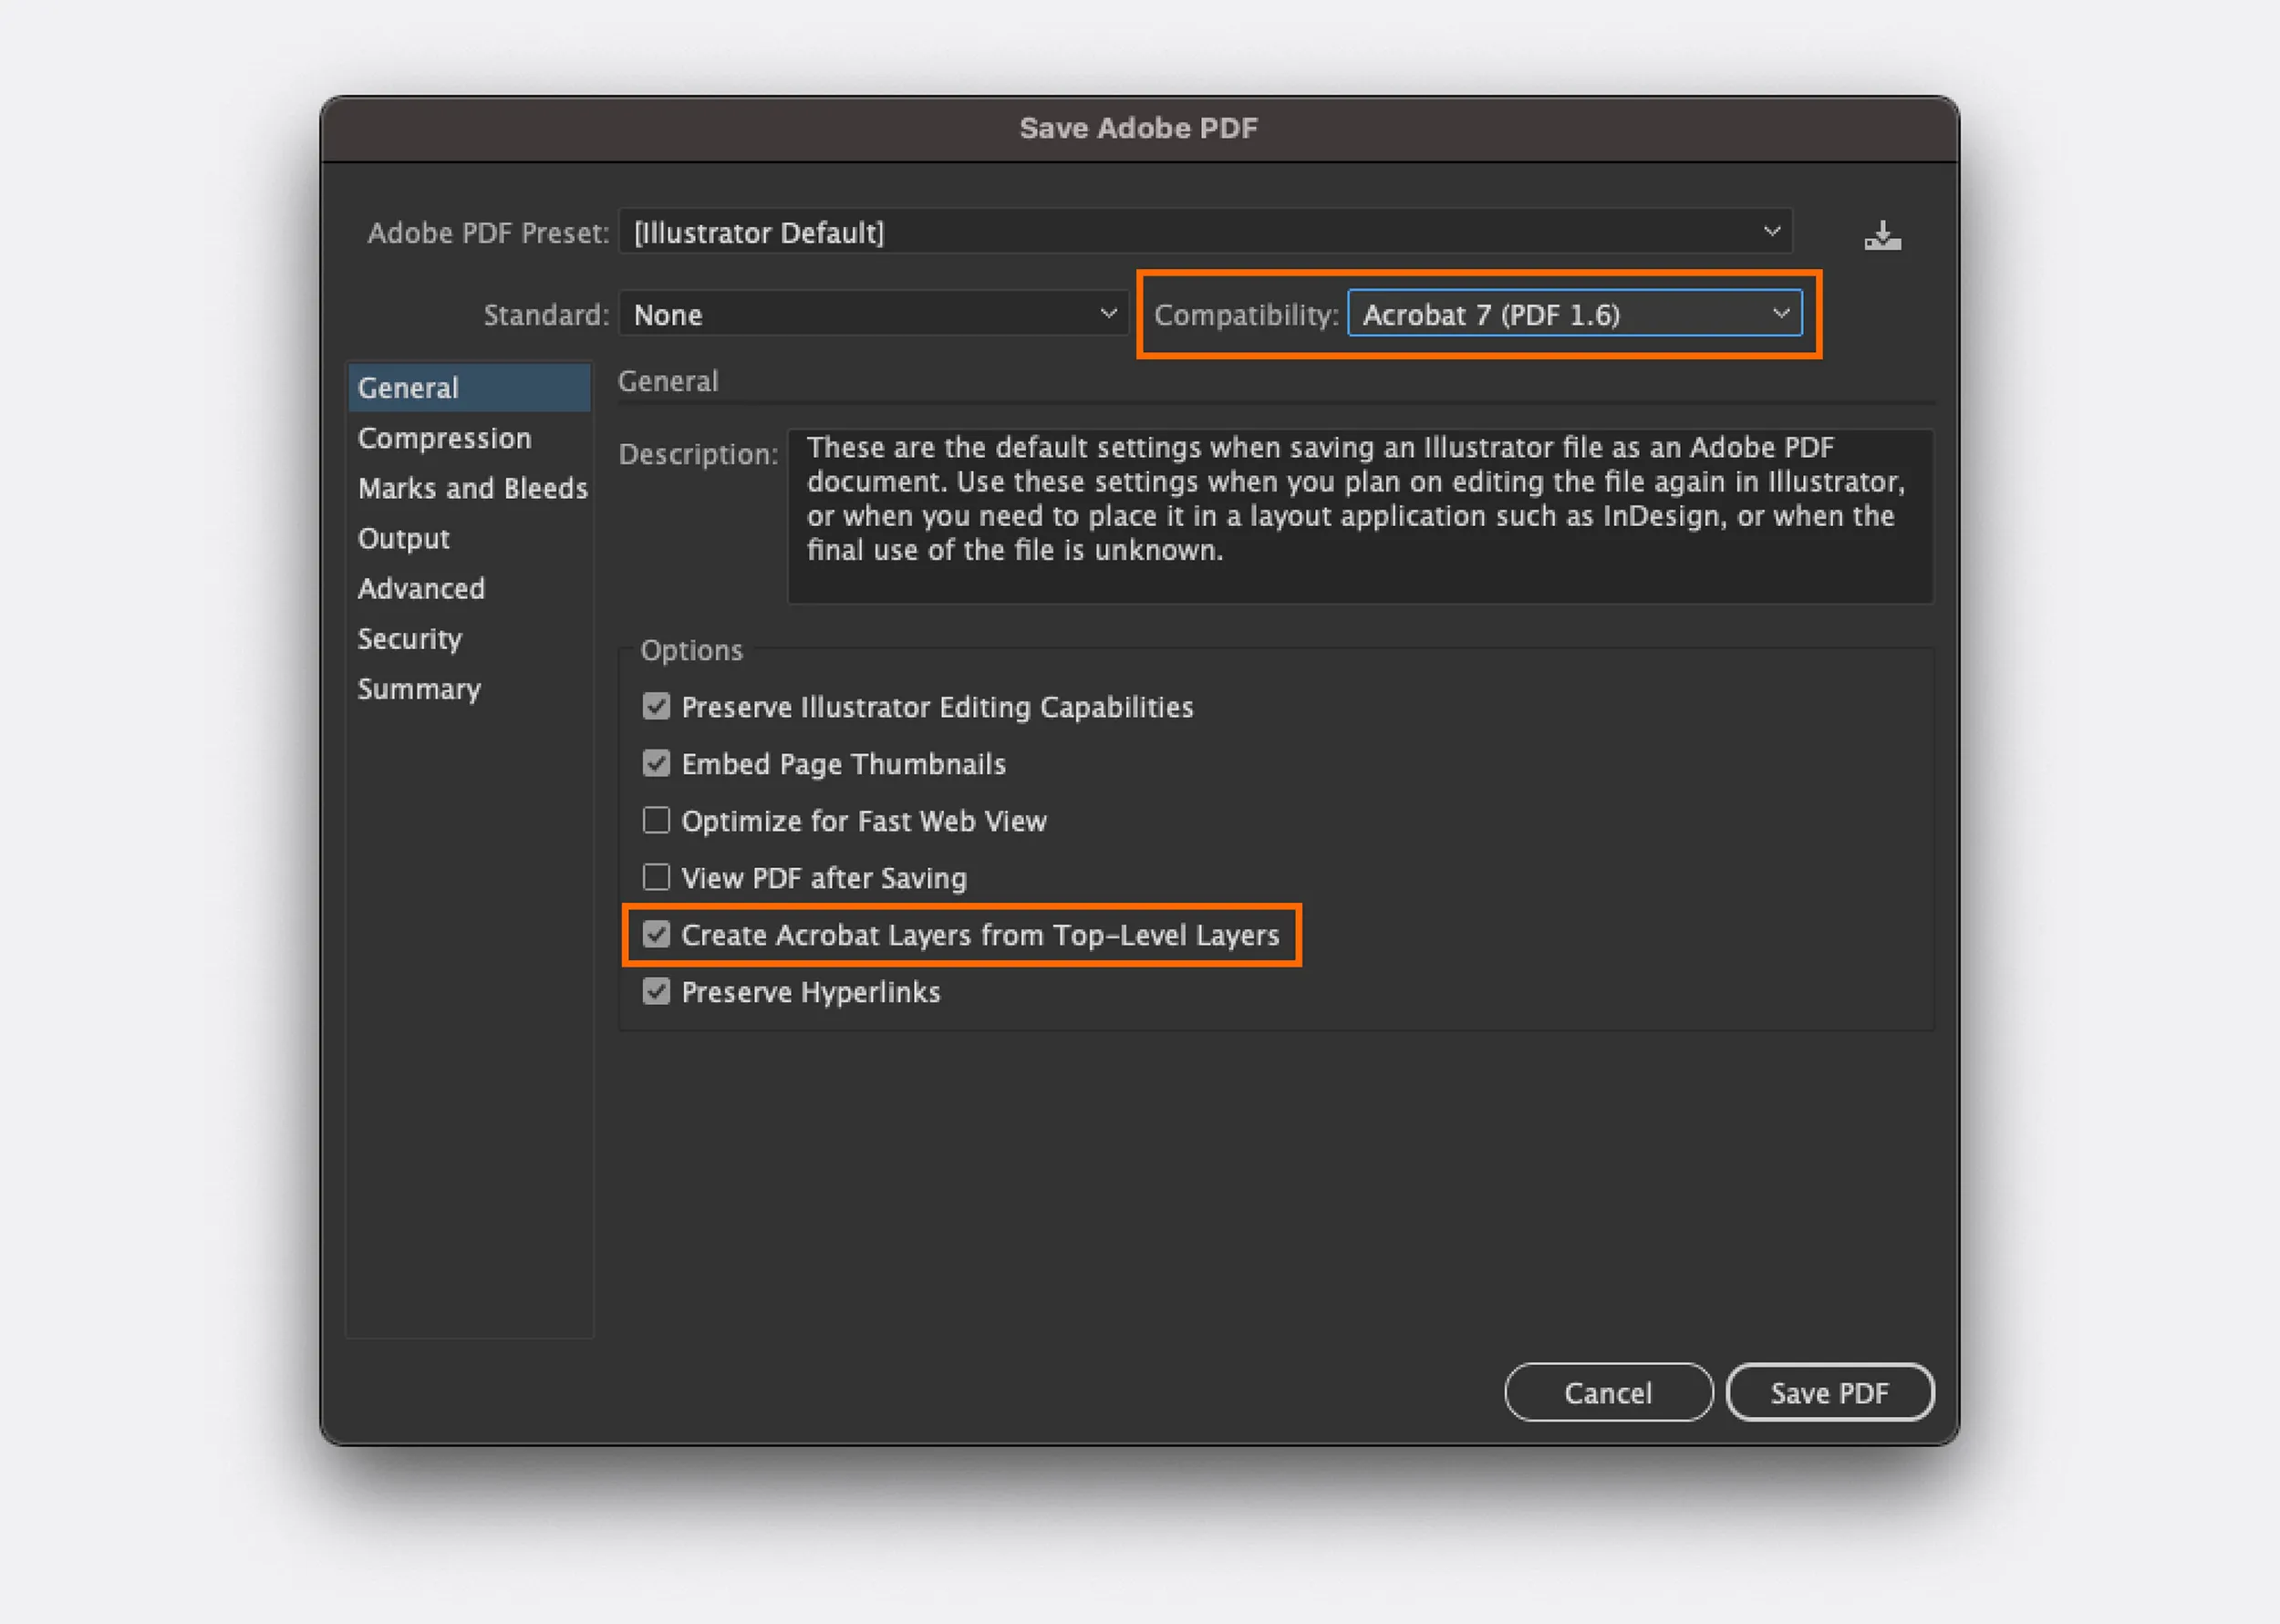
• Save your file as a PDF. No other file types are accepted.
• Choose Adobe 7 (or higher) compatibility when saving your PDF to preserve your layers.
• Under Options, make sure “Create Acrobat Layers from Top-Level Layers” is checked.
CMYK Only Holographic Stickers
▎OVERVIEW
• Printing CMYK only will yield no white in your design.
• Areas that would normally appear white due to paper color will appear holographic.
• The holographic effect will show through most colors and diminish with darker colors.
• Black or rich black areas of the design will have little to no holographic effect.
• Layers and spot color swatches are not needed for CMYK only printing.

Clear Stickers
There are two options when printing on clear vinyl: CMYK with White Underlayment or CMYK with White Underlayment + Spot White.
Follow the steps below to create your desired effect.
CMYK with White Underlyament Clear Stickers
▎OVERVIEW
• White will only be printed under all colored pixels in the file, all white pixels in the file will be unprinted on the clear vinyl.
• The white layer is printed on the clear material first, followed by the CMYK layer on top of the white layer.
▎FILE SETUP FOR CMYK with White Underlayment
• No file setup is necessary, our printer will print white under every colored pixel in the file.
CMYK with White Underlayment + Spot White Clear Stickers
▎OVERVIEW
• White will be printed under all colored pixels in the file, in addition to any white specified in the spot white layer.
• The clear vinyl will be unprinted anywhere not defined in the spot white or CMYK layers.
• The white layer is printed on the clear material first, followed by the CMYK layer on top of the white layer.
▎FILE SETUP FOR CMYK with White Underlayment+ Spot White
• Your file must include layers.
• Clearly label your Spot White layer as “Spot White” and your CMYK layer as “CMYK”.
• Create a swatch named “Spot White”.
• Make sure the areas you want to print just white on the clear vinyl are colored with that swatch.
▎SAVING OUT YOUR FILE FOR CMYK + Spot White
• Save your file as a PDF. No other file types are accepted.
• Choose Adobe 7 (PDF 1.6) compatibility when saving your PDF to preserve your layers.
• Under Options, make sure “Create Acrobat Layers from Top-Level Layers” is checked.

Border Chart Guide
